DC34: Badge hackin'
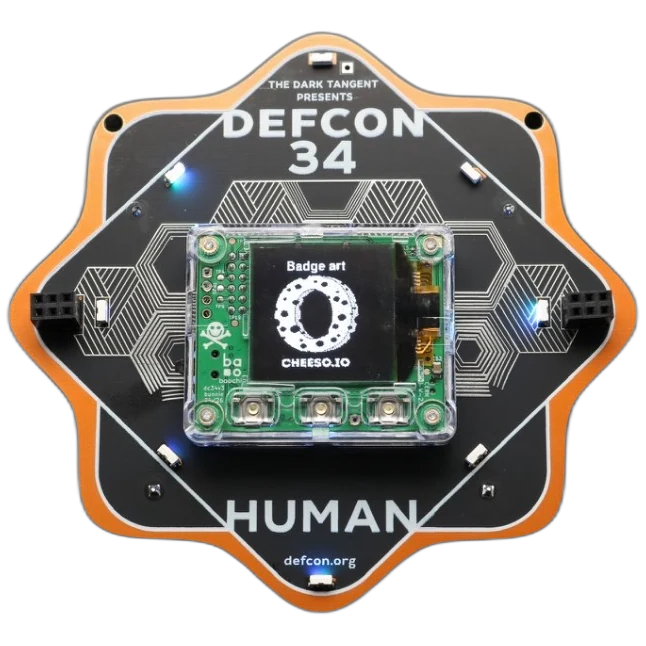
At DEF CON, the badge is rarely just the thing that gets you through the door. It is usually an electronic puzzle too, and the DC34 badge was a particularly fun one.
The badge has a clear, removable core built around the Baochip-1x RISC-V SoC. The core carries a 128×128 OLED, face buttons and a small camera used to scan QR codes shown on another badge. In conference mode it sits in a larger carrier and drives a light pattern around the artwork. It also plays a social game. Each badge starts with a limited range of colours; meet somebody with colours you want, trade encrypted QR codes between the two OLEDs and cameras, and the badges mix their light genes. You can accept the result, reject it and try again, or spend the weekend breeding something increasingly ridiculous.
After the conference the core comes off with two screws and becomes a USB security token. It supports FIDO2, TOTP codes and password storage. So before I touched it, the DC34 badge was already three things: conference credential, multiplayer light toy and a small computer intended to keep secrets.
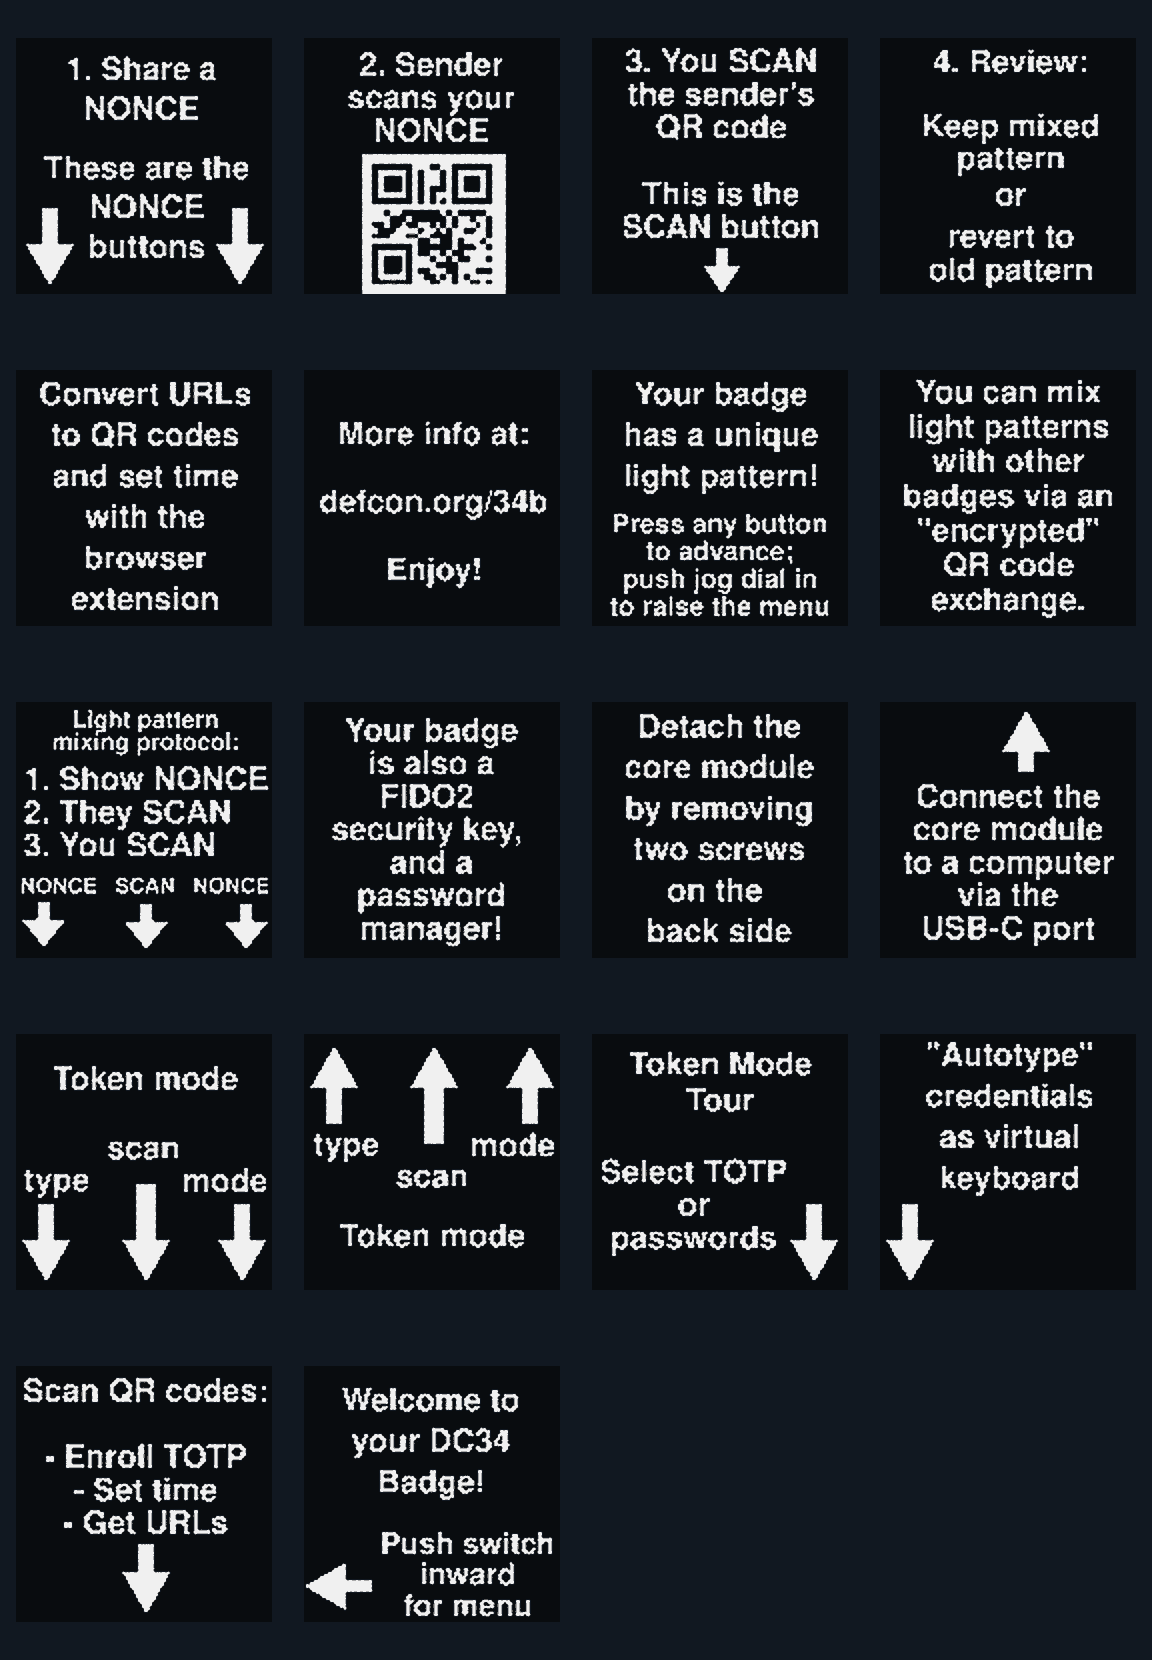
dc34-vault source. Badge and firmware by bunnie and the Baochip team.What the light genes do
A light gene is just a small set of settings for the LEDs: which colours can appear, how saturated they are, how quickly they move, which direction they travel and whether a white light chases around the badge. Each badge holds two sets. During an exchange it sends one set to the other badge, which mixes those settings with one of its own. That is why mating gives you a new pattern rather than simply copying somebody else’s.
The exchange is deliberately simple:
- Press the left or right button to show a request QR.
- The other person presses the middle button and points their badge’s camera at your OLED to scan it.
- Their OLED shows a reply QR; point your camera at that code to scan it back.
- Preview the new light pattern and choose Keep or Revert.
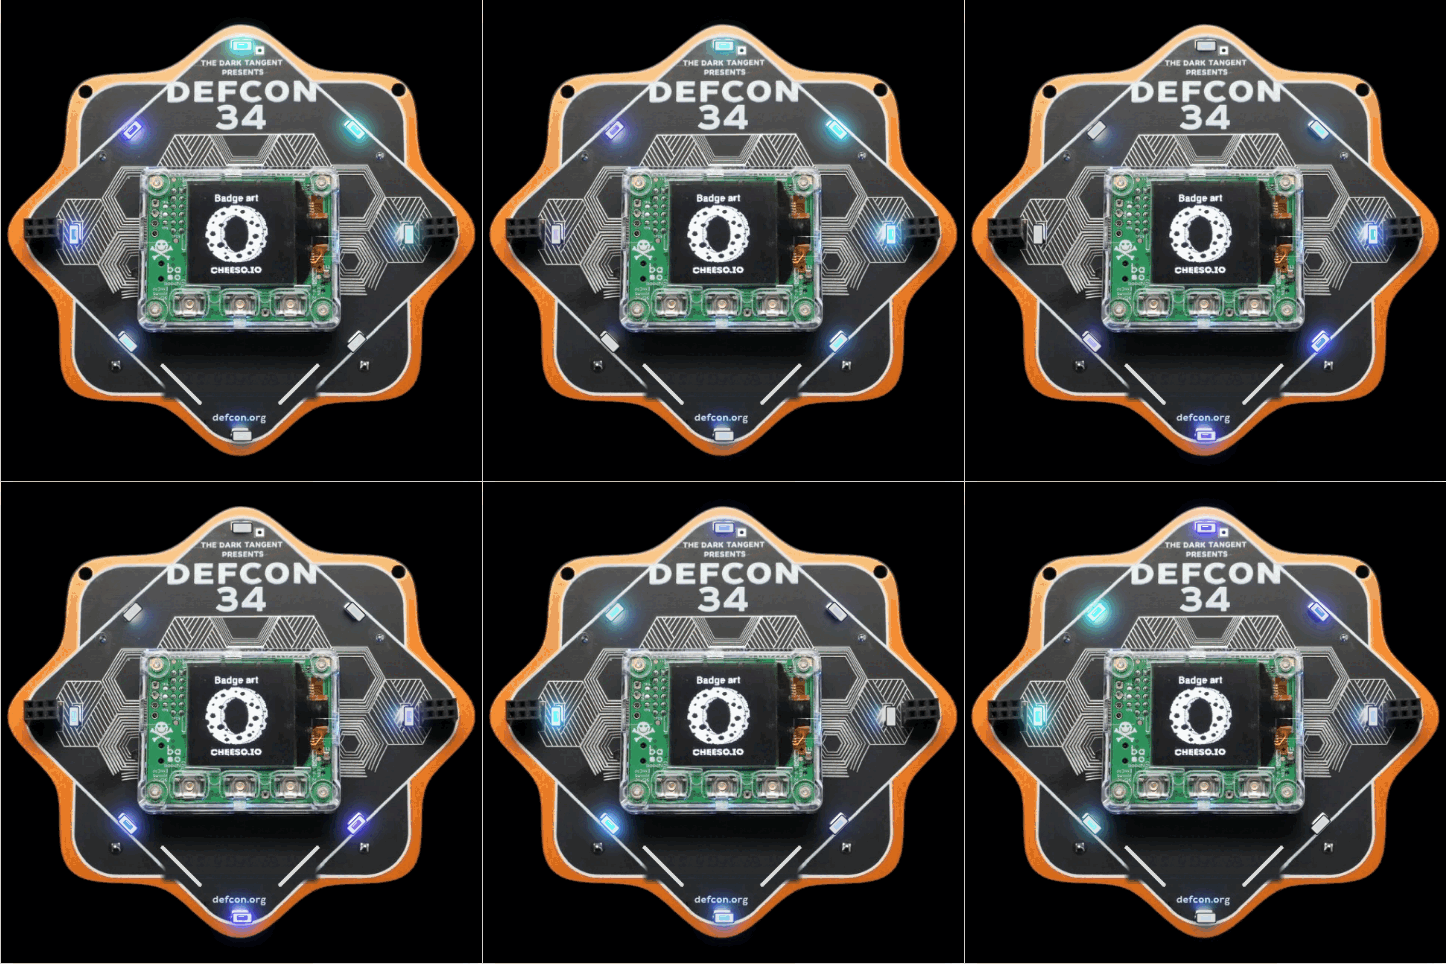
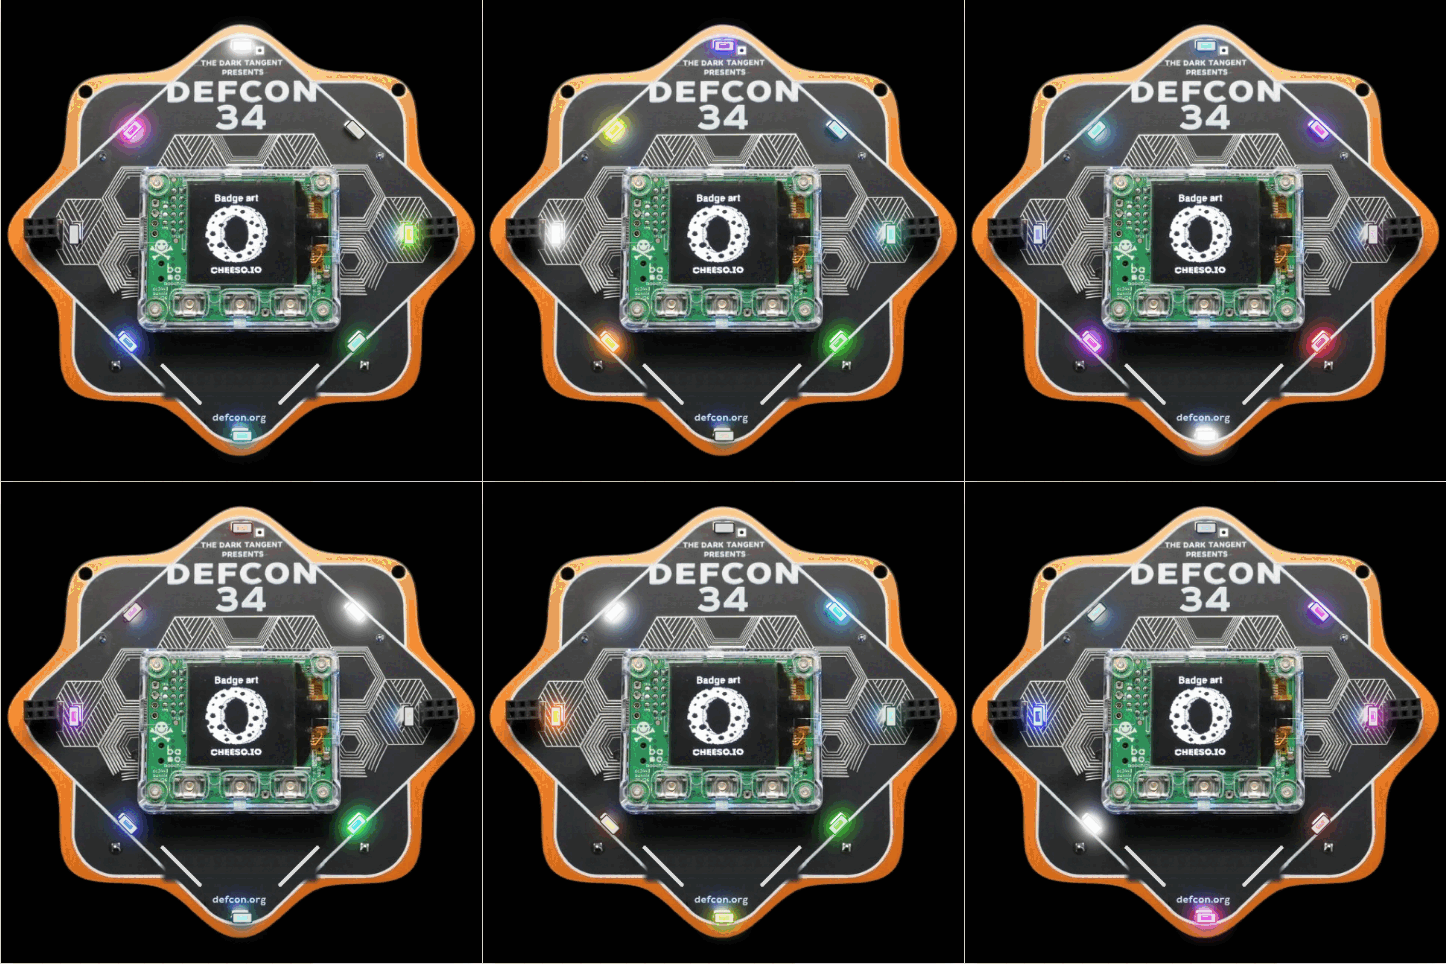
The result can be a narrow colour band, a red pulse, a full rainbow, or something much more frantic. The familiar blue/cyan look of a normal badge is a useful visual baseline. Apex shows the contrast: it opens the hue range all the way up while a white light chases around the perimeter. These two previews use the badge’s actual eight LED positions and firmware-style hue and brightness maths. I have exaggerated the bloom slightly so the light still reads at article size. The OLED stays monochrome because the gene controls the carrier lights, not the screen:
Key 0 is what makes the game work
The badge source tells us that the light game has one shared secret. The project README says every badge uses the same exchange key and calls anybody who recovers it a seeder: somebody who can introduce arbitrary light patterns into the population. In the code, the vault application reads a 32-byte record named k0, stores it in a 32-byte array and uses it as the key for AES-256-GCM-SIV. I will call it Key 0 (K0) from here on.
Here is what that means in practice. Suppose a badge shows a request QR and we want to send it the Apex rainbow from the examples above:
- The request QR supplies a fresh 12-byte nonce: a one-time number for this exchange.
- The sender combines K0 and that nonce with a 16-byte message containing the 9-byte light gene, padding and the sender’s badge type. The result is encrypted gene data plus a 16-byte authentication tag.
- The receiving badge performs the same calculation with its copy of K0. If the tag is valid, it previews the new gene. A wrong key, changed byte or reply made for a different nonce is rejected.
K0 does not choose the colours. It proves that the reply came from something which knows the shared badge secret. Recovering it lets us generate a reply QR for any fresh request, put any valid light gene we want inside it and have the receiving badge accept it as authentic. The encryption is still working; we simply have the key.
The source also tells us where K0 is kept. Xous is the operating system running on the badge. Its encrypted key/value filesystem is called the PDDB, short for Plausibly Deniable Database, and is stored on the badge’s external SPI flash. Applications refer to records by a dictionary and key name, a bit like a folder and filename. The badge defines the dictionary as dc34 and the key as k0, so the record we want is dc34/k0.
Knowing that name is not enough to read the raw flash. PDDB groups records into encrypted collections called bases. Each basis has random keys which encrypt and authenticate its pages. The keys for the .System basis, where K0 lives, are themselves stored wrapped by this badge’s User0 root-key hierarchy. Once the badge has securely mounted that basis, however, its normal PDDB service can return dc34/k0 to the vault application by name. That difference—encrypted bytes on flash versus a named record available to trusted software—becomes important later.
A map of the badge
From the outside in, the badge has two main pieces. The large conference carrier provides AA-cell power, the illuminated artwork and addressable lights. The clear removable core is the computer. It contains the face buttons, QR camera, 128×128 OLED, USB-C connector, Baochip-1x RISC-V system-on-chip and a separate SPI flash chip.
Inside Baochip-1x, 4 MB of non-volatile RRAM holds the boot programs and the Xous operating system. Think of it as the chip’s built-in flash drive. The same chip also exposes protected keystore slots and a smaller information region, or IFR, for factory and configuration data. The separate SPI flash chip is split between the PDDB and Xous’s swap partition, which holds encrypted memory pages when the operating system needs more room.

These targets did not come from staring at the board and guessing. K0’s name, size and location come directly from the badge source described above. The Baochip board definitions separately name THE_FLAG_1 in protected keystore slot 260. The third target came from following the public A0 chip RTL. nvrcfgs.sv names the first non-volatile configuration record as two 128-bit fields, cmsdata1 and cmsdata0, while brc.sv shows that record zero is loaded into this 256-bit pair. That made cmsdata0, the first 16 bytes of IFR row zero, a candidate to test after the normal slots, PDDB and flash came up empty. The RTL identifies a chip-mode field, not a flag; treating it as a Flag2 candidate was our inference. The map shows where those three targets land:
| Target | Where it lives | What normally protects it |
|---|---|---|
THE_FLAG_1 |
Keystore data slot 260 | Hardware ACL class Fw0; only the trusted keystore context may read it |
K0, stored as k0 |
Encrypted PDDB on external SPI flash | Per-basis encryption keys wrapped by the badge’s User0 root-key hierarchy |
| Flag2 candidate | First 16 bytes of IFR row zero, 0x6040_0000–0x6040_000f |
RRAM access-control logic |
They all depend on one larger promise: unsigned code should never run while those secrets still exist.
Powering on the badge follows this chain:
boot0 → boot1 → signed loader → signed Xous → badge applications
Each stage is supposed to verify the code it hands control to. If the bytes that will execute have changed, boot should stop. Developer mode deliberately allows custom firmware, but first erases the protected secrets. That stops the obvious attack of flashing a program which simply prints them.
Boot1’s update mode is different. It exists to install legitimate updates and can write RRAM without erasing the secrets merely because you entered it. The signature check at the next boot is supposed to make those writes safe. That makes the exact boundary between “bytes checked” and “bytes executed” rather important.
What I was trying to do
The immediate goal was now concrete: recover K0 from my sealed badge, verify that it was the right key and then create a fresh valid response for a light pattern of my choice. Naturally, I wanted to be a seeder.
There was a catch. Loading my own firmware the intended way would erase the flags and K0 before my code ran. I had to answer two questions:
- Could I make my code run while the badge still considered itself sealed?
- Once it ran, could it cross the separate protection around each secret?
Nastea1 had already found the answer to the first question: the first four-byte jump in the loader was executed but not covered by its signature. They had also published a separate silicon flaw in which instruction fetch could see protected IFR bytes that ordinary data reads could not. I used the same unsigned-first-word foothold, but took different routes after it:
- Flag1: boot a controlled Xous image → send the keystore a deliberately malformed serialized request → make the trusted keystore copy Flag1 from its own address space into the returned IPC page.
- K0: boot the same controlled Xous image → ask the PDDB service to reconstruct the existing
.Systembasis in a request-local cache → readdc34/k0→ return repeated, verified results over USB. - Flag2 row: use the shared loader foothold to run an IFR reader → map the IFR as code → let instruction fetch bypass the IFR’s data-read check → recover illegal instruction bits from the CPU’s trap report → reconstruct the legal instructions from what they did.
Nastea1’s published K0 payload instead stays bare-metal: it recreates the trusted user-mode identity, derives the filesystem keys, decrypts PDDB pages itself and sends the result through the OLED. Both routes share the loader-jump foothold; the K0 extraction after it is different.
The shared entry point: nastea1’s unsigned loader jump
Nastea1 found this bug by following the boot path through signatures.rs and sigcheck.rs: which bytes does boot1 verify, and which instruction does the CPU execute first? I reproduced it because it was the cleanest way to start my own extractor without entering developer mode.
The answers did not line up. The loader image starts at 0x6006_0000. Boot1 skips its first 132 bytes when calculating the signature because that header contains the entry jump plus signature metadata. Byte zero is therefore executable, but unsigned.
That first word is 0x3000006F, a RISC-V jal x0,+0x300. Boot1 verifies the signed loader body. Once that check passes, the CPU starts at byte zero and executes this unhashed jump instruction.
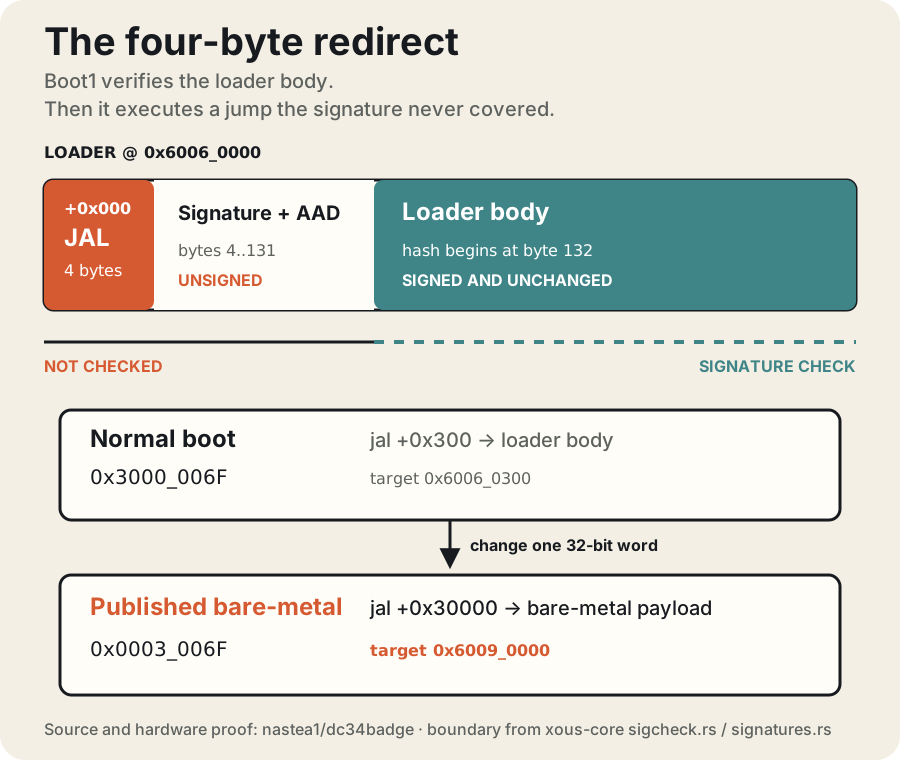
signatures.rs and sigcheck.rs in xous-core and were checked on the badge.Here is the whole exploit in one comparison:
| Loader word | What happens after the signature passes |
|---|---|
Original 0x3000006F |
Jump 0x300 bytes into the real signed loader |
Example 0x0003006F |
Jump 0x30000 bytes into attacker-controlled code in unused RRAM |
Nothing in the signed loader body changes. The badge verifies exactly the same bytes and accepts exactly the same manufacturer signature. The CPU then reaches the unsigned first word and follows the altered jump instead.
Boot1’s update console supplied the other half of the bug: it can place a payload in otherwise unused RRAM and change that first word. On the next normal boot, the unchanged signed loader body still verifies, but the CPU follows the altered unsigned jump into the payload. The change is a temporary door; restoring 0x3000006F closes it again.
The complete bare-metal build, write and restore procedure is in nastea1/dc34badge. elf2bin.py refuses to let a payload overwrite Xous, and uf2send.py constrains the writable addresses. That repository is the source for the jump bug and the direct payload route; it is not the source for the temporary-Xous extractor described below.
Nastea1’s route after the jump
The jump only gives code execution. Nastea1’s payload ran bare-metal, without starting Xous. Machine mode still could not directly read the protected keystore values: reads are denied and returned zero. The hardware also checked the address-space identifier, or ASID, attached to a virtual-memory access. Their payload therefore entered user mode with ASID 3, matching the legitimate keystore service’s trusted context, and read the protected device material from there.
From there, their K0 payload rebuilt the PDDB master key, unwrapped the key for the protected .System namespace—called a basis in PDDB terminology—decrypted candidate pages from the external SPI flash and searched for K0. Because USB was unavailable to that bare-metal payload, it displayed eight bytes at a time on the OLED for recovery with a phone camera. The complete implementation and walkthrough are in nastea1/dc34badge.
That route proved K0 could be recovered from a sealed badge. Mine starts from the same unsigned-first-word vulnerability, then deliberately stops following the bare-metal path.
A different route: boot a temporary Xous system
There are four pieces to name before the next step:
- boot1 is the badge’s early boot program. It verifies the signed loader and provides the update mode used to write storage.
- RRAM is the chip’s built-in non-volatile storage: it keeps its contents without power, but boot1 can rewrite it. It holds the loader and the Xous operating system.
- A Xous image is that operating system packaged for the loader to start.
- Its swap image is the matching area on the SPI flash where Xous can store memory pages outside the chip.
Developer mode is the obvious way to run modified software, but selecting it clears Flag1 and the protected key material needed to unlock K0. That would destroy the things I was trying to recover. Boot1 update mode is different: it can write the required storage without selecting that developer-mode erasure path.
The important observation was that the badge already contained the complicated code I needed. Its normal root-key and PDDB services know how to use the protected device material, unwrap the .System basis keys, authenticate its pages and find a record by name. Instead of rebuilding all of that cryptography in a tiny bare-metal payload, I wanted to start a controlled Xous system and let the badge unlock its own filesystem.
I call the tiny setup routine that makes this possible stage-zero. It runs briefly before the normal loader, prepares the temporary boot and then gets out of the way:

- Prepare without developer mode. The host first established and verified a known-stock loader. It then wrote the temporary Xous image into RRAM, its 12 KiB swap image into the SPI swap partition, and the altered entry word and trampoline used for the detour. The encrypted PDDB sits four MiB later in the same flash chip, so this swap write did not touch it.
- Let boot1 verify the stock loader. On the next boot, boot1 authenticated the original signed loader body just as it would on a normal boot.
- Take a short detour, then rejoin. The unsigned entry word jumped through a two-instruction trampoline to stage-zero inside the temporary image. Stage-zero checked a security-state value and the exact loader bytes it expected, temporarily replaced six fixed 32-byte loader regions, installed a restoration hook, flushed the instruction cache and handed the temporary Xous image back to the normal loader.
- Boot, extract and restore. The normal loader started the temporary Xous system while the protected material was still available. The runtime hook restored the small loader changes. After extraction, the host rewrote and audited the pinned stock loader, Xous image and swap, then verified the stock Xous version after boot.
For anyone following at instruction level, the detour was 0x6006_0000 → 0x6008_b1c0 → 0x6039_0000. Stage-zero then returned to the normal loader at 0x6006_0300 with a0 pointing to the temporary Xous image at 0x6009_fd00.
The reviewed extraction artifact contains the exact stage-zero binary, but its source and symbol map were not preserved, so I cannot honestly assign each of those six patched regions to a named source-level check. I have not published that binary bundle as part of the source repository. What the byte audit and badge run establish is the measured result: boot1 accepted the stock loader’s signed body, the temporary Xous system started without taking the developer-mode erasure path, and the final stock restore passed both loader and runtime checks.
K0: let the badge unlock its own filesystem
The temporary image retained the vendor PDDB service and its normal key-unwrapping and authentication path. My change added one narrowly scoped extraction request. It reconstructs the existing .System basis in a request-local RAM cache, reads dc34/k0 and returns only a 32-byte result. It does not publish that mount to the service’s global cache or call the format, create, sync, key-rotation or storage-write paths.
let k0 = pddb::Pddb::new()
    .extract_k0_read_only()
    .map_err(|_| "atomic read-only dc34/k0 extraction failed")?;
Here dc34 is the PDDB dictionary and k0 is the record name. The length check and request-local cache live inside the service-side implementation in the reconstructed Xous patch. It may accept an old key wrapper for use in RAM, but it deliberately does not persist that upgrade. Corrupt storage can still upset the running PDDB service, so this is a narrow “no persistent PDDB write from this request” claim, not a claim that every malformed-storage error is harmless.
That is the core difference. Nastea1’s payload impersonates the trusted keystore context and performs the key derivation, key unwrap and PDDB page search itself. My extractor lets the normal PDDB service do those jobs and requests the already-decrypted dc34/k0 record by name.
The temporary Xous image emitted repeated numbered USB-serial frames containing Flag1, K0 and K0’s published SHA-256 prefix. The host required at least two complete frames to agree, then verified K0 against a synthetic release-time AES-256-GCM-SIV confirmation vector with a full 128-bit tag. That vector checks the implementation and candidate key consistently; it is not separate evidence that a physical badge exchange was captured.
K0 was cleared for release and is shared by every DC34 badge:
K0 = 7ad84ed0e00aec0499ede65615e1da517c0150230d2abc6ec7b566e621e740b3Hashing those 32 bytes gives dca9ea49514cb9fb5a6c2197ad80431971aacb6b897dbe9e15eee2ff266a48b4, matching the firmware’s published dca9ea49 prefix. That on-badge prefix is the independent commitment; the synthetic full tag is a stronger consistency check for the candidate key and verifier, not proof of a captured exchange.
This approach trades seven photographed OLED pages for repeatable USB frames. After the USB result validated, I re-entered boot1 and ran the restore mode, which wrote the pinned stock loader, Xous and swap images, proved the stock loader’s signed identity and then queried the rebooted badge for its exact stock Xous version.
The code
I cleaned up the recoverable source and published it at AndrewMohawk/dc34-badge. It contains the guarded macOS host extractor, the K0 verifier, the standalone Flag1 reader and structured USB output, plus the reconstructed Xous PDDB patch.
The host does nothing without an explicit mode. Before either write path it requires the exact badge USB serial number and a typed confirmation. It stores recovered values in a new mode-0600 file outside the repository and restores the stock images by default.
There is one important gap: the exact stage-zero source and symbol map were not preserved, so this is not a claim that the reviewed UF2 can be rebuilt byte-for-byte. I have also left the UF2 bundle out of GitHub while redistribution terms for the embedded third-party firmware remain unclear. The host pins the reviewed archive and every member by SHA-256; the repository shares every safely recoverable source component without pretending the missing piece exists.
Go breed something ridiculous
I put the released K0 into Gene Mate, a browser-only virtual mate for the real badge. Pick a preset or tune the light gene yourself, scan the request QR from your badge, then show it the generated reply and choose Keep or Revert.
The request decoding, AES-256-GCM-SIV encryption and reply-QR generation all happen inside your browser. The camera stops as soon as it has the request, and Gene Mate does not upload badge data or camera frames.
Flag1: make the trusted keystore copy it out
The same temporary Xous image recovered Flag1 through a separate software bug. Flag1 lives inside the keystore process, PID 3. My console could ask that process to perform cryptographic operations, but it could not normally read the process’s private memory.
Xous services exchange structured messages by temporarily lending one 4 KB memory page to another process. The keystore’s AES-oracle request contains a serialized Rust string represented by a length and a relative pointer. The server deserialized that object without first proving the pointer stayed inside the lent page.
I placed the root of a forged ArchivedAesOp request at offset 0xef4, near the end of the page. Its string was 32 bytes long, but its relative pointer was chosen so that, when Xous mapped the page at 0x4000_0000 in PID 3, it pointed to Flag1 at 0x6000_4080 instead of to bytes inside the message. The keystore’s unchecked to_original() call followed that pointer while deserializing the request. Its Buffer::replace() reply then serialized the object back into the page, copying those 32 bytes from keystore memory into a response my console could read.
caller IPC page
    ↓ mapped into keystore PID 3 at 0x4000_0000
forged 32-byte string pointer ──→ Flag1 at 0x6000_4080
    ↓ keystore serializes its response
Flag1 bytes copied back into the caller's page
In short, the extractor did not obtain permission to read the protected slot directly. It persuaded the already-trusted keystore service to copy its own secret into a response.
For the evidence used here, the host accepted Flag1 only after at least two complete numbered frames returned the same 32 bytes. The method is public here; the value remains withheld pending explicit release clearance because it was designated as a game prize.
This is not another boot bypass. The shared loader jump is still what lets my controlled client start. The missing bounds validation in the keystore’s serialized IPC request is a separate disclosure primitive used after that foothold.
Extending nastea1’s IFR fetch reader
The loader redirect explains how I ran code. The separate RRAM hardware bug used for the IFR work was already published by nastea1; I reproduced it on my badge and then extended the reader to handle legal instructions.
RRAM has a small information region, or IFR, alongside the main storage. It contains factory and configuration data which normal software is not supposed to read. The processor can reach that memory in two different ways:
- A data read asks for bytes to put in a register, like opening a file.
- An instruction fetch asks for the next bytes the CPU should execute as code.
The source-level reason nastea1 documented is visible in rrc.sv: every IFR access-control error depends on a signal named data_op. A normal data read sets it. An instruction fetch does not. When data_op is zero, the IFR protection term disappears before RISC-V privilege levels or ASIDs enter the picture.
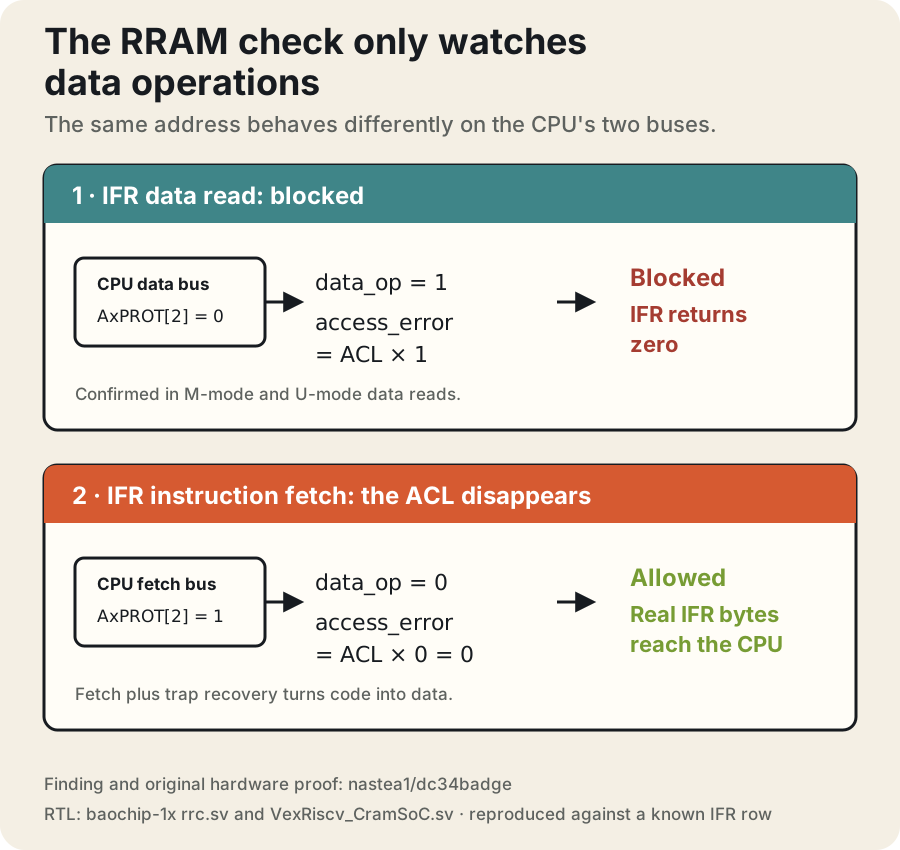
rrc.sv and VexRiscv_CramSoC.sv. This article relies only on the IFR measurement with its known public-row control; results for the other RRAM apertures are outside its scope.Nastea1’s source analysis and hardware test established the bug, but I still needed a control for my own run. I reproduced their test against a row at IFR offset 0x1a0 whose public-key bytes are already shipped in the vendor repository:
| Reading the same public IFR row | First eight bytes returned |
|---|---|
| Normal data load | 00 00 00 00 00 00 00 00 |
| Instruction-fetch reconstruction | a8 7a 5f 98 da ab fb 51 |
| Vendor’s published blob | a8 7a 5f 98 da ab fb 51 |
That was the control I needed. The data path was blocked, while the instruction path recovered known non-zero bytes from the same protected region and matched the independent vendor file.
There is one awkward detail: an instruction fetch does not hand the bytes back as data. The processor tries to execute them. On this Baochip core, an illegal-instruction trap copies the offending instruction bits into a register named mtval. Recording that register turns the CPU’s error report into a tiny read channel.
The reader works two bytes at a time:
- Map the IFR page execute-only, then set the user-mode program counter to one selected 16-bit halfword.
- If it is illegal, recover its bits from the CPU’s
mtvaltrap register. - If it executes, record the later safety trap and the registers or program counter it changed.
- Advance two bytes and repeat.
- Run the same path over a known public-key row and compare it with the vendor blob as a control.
For safety, user mode had only the target IFR page mapped execute-only, with no readable or writable user mappings. A fetched load, store, privileged instruction or jump outside the test page therefore trapped instead of reaching useful memory or memory-mapped hardware. The machine-mode handler recorded the state and moved to the next halfword.
That is how nastea1’s bug becomes useful: it turns an execute-only view of the IFR into a byte-recovery method. It does not need ASID 3 and it is not another side effect of the loader redirect. The shared loader bug gets my reader onto the badge; the silicon bug lets that reader see IFR bytes which ordinary loads cannot.
The Flag2 row was made of instructions that worked
After I had exhausted the data slots, key slots, PDDB and external flash, I followed the public A0 RTL to cmsdata0: the lower 128-bit half of its first non-volatile configuration record. That pointed to the first 16 bytes of the 32-byte row at the IFR base, 0x6040_0000. The source did not identify it as Flag2; it only gave me a plausible chip-mode value to test. On the badge, the normal boot1 data read returned zero there, making it a useful target for the instruction-fetch path.
The fetch reader recovered bytes 0–7 and 14–15. Bytes 8–13 kept appearing as zero.
They were not zero. Those six bytes happen to decode as three legal compressed RISC-V jumps. Legal instructions execute instead of raising an immediate illegal-instruction trap, so there is no useful mtval. My “reader” had silently run them until each jump left the only executable page and hit the safety trap.
| What the halfword does | What I can learn |
|---|---|
| Illegal instruction | Its exact bits appear in mtval |
| Valid jump | The observed target reveals the encoded offset |
| Valid jump-and-link | The target plus the changed link register identifies it |

To recover them I zeroed all 31 general-purpose registers, executed one halfword at a time and saved the complete register file plus mepc, mcause and mtval on the next trap. That later trap exposed the jump destination and whether the link register had changed.
A compressed c.j changes the program counter. A c.jal changes the program counter and writes PC+2 to x1. The compressed-jump immediate encoding is reversible, so the observed target and whether the link register changed identify one exact 16-bit instruction. Brute-forcing all possible compressed jumps produced a single match for each of the three missing halfwords.
That gave a byte-exact reconstruction of the complete 16-byte candidate. The run also read the known public-key row through the same path, and each recovered jump was checked independently from its target and link behaviour. The evidence does not independently establish whether Flag2 is the whole 16-byte value or one field within it. The reconstructed value remains withheld because it overlaps chip-mode configuration material; what I can claim here is the measured read and reconstruction method, not an independently delimited Flag2 value.
How this differs from the other badge work
Several people were pulling on different parts of the badge at the same time, so “new” needs a baseline.
vmfunc/dc34-badge found an access-control indexing mismatch. Data slots are 32 bytes wide, but one ACL read path effectively groups them in 64-byte pairs. That can make neighbouring slots share a permission decision. The interesting pair was slot 264, marked Fw0, beside open slot 265. It was a real privilege-boundary error, but it did not expose Flag1: slots 260 and 261 are both Fw0, and the work did not provide a path which could read the protected value from a sealed badge.
Oridevformeridian/dc34-badge-re found that the badge console would load unauthenticated programs onto the four small programmable-I/O processors. That was genuine code execution without developer mode, but the production memory filter redirected protected reads to a harmless dummy address. The program ran; the useful memory never came back. Their next route was fault injection against signature verification. After nastea1’s loader redirect was published, they replaced that campaign with the four-byte method and credited it as the nastea1 method.
Against that baseline, this project contributes three different post-foothold results:
- The temporary-Xous K0 extractor starts from nastea1’s unsigned loader redirect, then reads
dc34/k0through a request-local PDDB cache which is never published as a writable mount and does not invoke a persistent storage-write path. It does not use their bare-metal ASID-3, manual key-derivation, page-sweep and OLED route. - The keystore IPC disclosure recovers Flag1 through an unchecked serialized pointer. Nastea1’s payload read the same target directly from a forged trusted context; this route instead tricks the legitimate keystore service into copying the value into its reply.
- The legal-instruction reconstruction extends nastea1’s instruction-fetch ACL finding. Illegal halfwords appear directly in
mtval; legal compressed jumps have to be recovered from the program-counter and link-register changes they cause. That extension completed the candidate Flag2 row.
The loader jump and the underlying instruction-fetch ACL flaw are credited to nastea1. Neither K0 route breaks AES: nastea1 reconstructs the correct filesystem keys around it, while this extractor delegates that work to the badge’s legitimate PDDB service after the secure-boot boundary has already been crossed.
The practical result loops back to the light game which started this story: Gene Mate can now produce a valid encrypted gene exchange without revealing either withheld challenge value, and the extractor does not write the badge’s encrypted PDDB partition.
The K0 extractor reconstructs .System in a request-local RAM cache and does not call the format, create, sync, key-rotation or storage-write paths. The temporary swap partition is modified during extraction; the encrypted PDDB partition is not. After extraction, I re-enter boot1 and run the host’s restore mode, which writes the pinned stock loader, Xous image and swap, audits the signed loader identity and verifies the rebooted stock Xous version. Flag1, the candidate Flag2 row and the chip-mode bytes remain withheld; K0 is included in full.
Keep it punk.
-AM